Freitag, 29. Januar 2016

Workbench: Stages in the life of historical flats

In my last workbench post, I showed a few snapshots of current work in progress. This time I want to illustrate the steps each flat mini takes from the box to the final tabletop unit.

Here is a picture of the minis as they march out of the cardboard box delivered by Grünewald Zinnfiguren: 
Austrian infantry, firing (Grünewald pack 165 "dt. Füsiliere im Gefecht, feuernd"). Test setup in two bataillons, with gaps in all positions where I need to order additional minis to fill the ranks.

Although Grünewald does sell individual minis (at a slight premium) it is always best to start with the unit packs. In my case I need 24 minis per bataillon, so I can build two infantry bataillons out of one box of 37 minis (illustrated above) when I add a handful of single ordered individually, like additional flag bearers and officers. The mounted officer included in the infantry boxes can be used as division commander, general staff etc.

Cavalry boxes have 17 minis each, so they are sufficient for one unit with 16 minis each, without the need to add anything (in fact, one mini is left over for other uses like army staff etc.).

For the Austrians this was particularly tricky, because they have one kneeling and two standing poses to support the normal Austrian three-rank formations, but I will use them in two ranks like all other tabletop units for Shako. So I needed to figure out whether the mix of poses in the unit pack actually supports getting to two batallions by just adding minis (the good news: it does work).

In the next picture you can see the various stages the minis go through.

Top to bottom: 1. blanks in the cardboard box from shipping - 2. first base layer (protective layer) - 3. second base coat (white) - 4. half painted.
When they come out of the box, the minis have to be cleaned up (removing leftover grates from the casting process) and washed with warm water and a little soap. After gluing them to a wooden stick with PVA, two base layers of color are sprayed on: a protective layer (with the kind of primer you also use to base coat car parts), then a white base coat as the carrier of the real paint (I use tabletop modelling base coat from Army Painter or Games Workshop).

For the actual painting I use artist's watercolors. You can see the box in the photo below. These colors work perfectly with white base coating, because for "raised" areas they can be applied a little thinner with the white shining through for highlights, and there is no need to apply multiple layers of color anywhere. They also allow for very fine freehand and easily provide bright colors, even in light tones like yellow or sky blue that are hard to do with acrylics on dark base coat.

I only use acrylics very occasionally for silver and gold flag or uniform embroidery (I use water color tones of grey for other metals), and acrylic white to clean up fine details on top of water color painted areas.

The beauty of working with these colors is the extremely small amount of time and space needed to set up. I often need to use short, twenty to thirty minute chunks of time for painting. With colors like acrylics or oil which require individual containers per color, palettes, thinners etc. the time to set up and clean away things is too long for me. It takes me about two minutes to take the material shown below out of storage and start painting...

I learned this technique at the Munich Klio meetings of flats collectors in the early nineties.

Prussian Hussars in process, with the water colors and my main reference for Prussian SYW unifirms (Bleckwenn, pocket edition) on top.

Once the minis are painted, they get to dry for at least twelve hours before they get a solid (shiny) coat of spray varnish to pretect them from humidity (these colors remain water soluble at all times).
  
I have already shown how the minis are based for tabletop gaming here. I'm not sure yet whether I'll start to flock the bases with some static grass, so far I actually like the simple brown paint job on the bases because it doesn't distract from the minis themselves with their colorful uniforms (I have found that green bases visually block out a lot of the uniform colors).

To see what they look like on the tabletop you can take a first look here.

For comparison with more conventional painting methods, you can check out the incredible historical dioramas in the Plassenburg flats museum (I went to elementary school in Kulmbach, that's where I got infected with the flats bug...)

Dienstag, 19. Januar 2016

The flats are marching - encounter 1: delaying action


(Zusammenfassung auf Deutsch: erster Ausmarsch der Grünewald-Figuren, die ich bisher angemalt habe: die Reichsarmee versucht, den Vormarsch eines kleinen preussischen Korps zu verzögern. Regeln: Shako, Figuren: Grünewald, ich hoffe, die Bilder sprechen für sich selbst. Ein Klick auf die Bilder bringt eine größere Version auf den Bildschirm).

I don't really have enough minis ready for a proper game, but couldn't resist giving them a chance to take a first walk on the tabletop after finishing the seventh unit.

I used the Shako ruleset (not Shako II), but without written orders and with flexible interpretation of the division and army morale rules (considering there was a total of seven units on the table...). I did use the special SYW rules for deployment of the battle lines from the march in columns, though, because this kind of maneuvering is part of the visual and tactical appeal of 18th century battles for me.


The idea is to string a few practice games into a loosely connected series of games with a simple narrative. Maybe something like a fictional intrusion of a regular Prussian force into Franken (similar to the real 1759 campaign in Franken by the Wunsch Freikorps). This initial engagement will be a simple delaying action where the Imperials try to gain time to organize their forces.

The order of battle is the small fraction that I have already painted of the OB present in the 1759 combat of Zinna, the theme of my first historical flats project in a long time.

Prussians (on the right side of the photos)

  • I. Bat. Salmuth Fusiliers
  • II. Bat. Hoffmann Fusiliers
  • Converged Grenadier bat. Burgsdorff
  • Converged Grenadier bat. Willemey

Allies (coming from the left)

  • I. Bat. Hohenlohe 
  • I. Bat. Kurpfalz Foot Guards (should be the II. Bat., but I couldn't resist painting the more fun combination of life and company flags)
  • Hohenzollern Cuirassiers

I took a photo after most turns, here we go (as always, click on the photos to see enlarged versions):

After turn 2: columns marching onto the table, Prussians start deploying into line of battle first to avoid being caught unprepared by the opposing cavalry
Turn 3: the Prussians are deploying into two lines, the Imperial troops are taking the high ground on the hill.
Turn 4: both sides have deployed, the grenadiers on the Prussian left form a square to fend off the Imperial cavalry (there are no hasty squares allowed in the SYW version of Shako, so you better get prepared in time...)
Turn 5: the initial infantry deployment is done, the Hohenzollern Cuirassiers on the Imperial right are starting to bypass the Grenadier square on the Prussian left in a wide, sweeping flank movement.
Turn 6 (viewed from behind the Prussian lines): the Cuirassiers continue their movement around the left flank into the Prussian rear, the Prussian second line is turning around to face this threat. Meanwhile, on the hill the infantry lines are closing in - the Imperials retreating slightly after reaching their hold position on the hill to give their cavalry more time for the flanking movement.
Turn 7: on the hill, the first volleys are being fired. To the surprise of everyone, the Imperial foot severely hurt the Prussian grenadiers on the hill, swinging the momentum in their favor. (In rules terms, the Kurpfalz foot guards, usually considered second rate at this stage of the war, stagger and cause a kill on the grenadiers in their very first volley, taking no damage in return).
Turn 8: the surprises continue - the Kurpfalz infantry charge the staggered Grenadiers on the hill, cause another two kills in the approaching fire (I do assume that chargers get to fire before engaging, although it isn't 100% clear to me from the rules), enter melee unfazed by the return fire from the Prussians and break the Grenadiers in the ensuing melee. At the same time, the infantry at the foot of the hill exchange a first volley, this time with the more expectable results in favor of the Prussians. The Cuirassiers have nearly finished their ride around the battlefield, distracting half of the Prussian force without engaging them or giving them a chance to fire a volley.
Turn 9: The Prussian fusiliers at the foot of the hill break the Franconian infantry in their front. Happy with a successful delaying action and the surprising performance of the Kurpfalz foot guards, the Imperial troups retire from the field to preserve their troops to fight another day.
Overall a fun game. I'm very positively surprised in many ways: 

  • the flats move well on the tabletop - if you handle the stands carefully, with stable plastic bases they feel like they can take being moved around on the tabletop, although I will look into magnetic regimental bases going forward to avoid too many direct touches of the minis themselves.
  • the flats look great, as well - in linear battles most units tend to face the same direction, and as long as they do I like the photos that come out. In many ways I think the neat rank and file presented by flats with more realistic body proportions is more visually pleasing and easier to "read" than a similar number of the usual full-bodied 3d tabletop gaming minis with many different poses and oversized hands and faces - these tend to look fantastic in skirmishing games but dissolve into an indistinguishable mass of colors and movement in larger numbers.
  • the Shako rules are easy to use. Although this was my first Shako game in many years, I had to reference the rulebook very infrequently, and find that many aspects are not only simple enough to fit on the two page Quick Reference Data Sheet but could also be memorized nicely over time.
  • once the battle starts, SYW battles are much more restricted than Napoleonic battles fought with Shako (as they should be). But this is not only historical, it is also counterbalanced by the really challenging task to deploy your army from the initial march columns entering the field. I really look forward to trying this again with more units. The only challenge will be to find a large enough battlefield when the number of units involved grows. Maybe I'll have to use the "Marching to Glory" supplement as a partial replacement to a full on-board deployment.
  • With six bases per infantry unit, I like to visualize the unit state via the arrangement of the bases - cleanly aligned for good order, slightly out of order for staggered, facing backward for "fall back" etc. I just need a good idea how to distinguish blown from staggered cavalry. I'm even thinking of removing bases to reflect kills, that might look more appealing than counting kills with dice or other tokens palced next to the units.
Coming up next: a rearguard action where the units that took losses in this ancounter will start with a a kill or two each to introduce some continuity.

Mittwoch, 6. Januar 2016

Ankerbausteine Freestyle: Turm

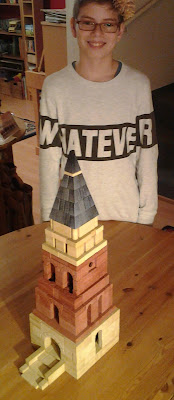
Wieder einmal haben wir die Muße der Ferienzeit genutzt und Jakob hatte die Idee, einen Turm mit Ankerbausteinen zu bauen.

Als Steinvorrat haben wir GK-NF 14 zur Verfügung. Wir haben kaum die Hälfte der Steine genutzt, allerdings auch einige Steine die erst in den höheren Kästen drin sind wie fast alle steilen Dachsteine und die ganz kleinen, flachen Torbögen mit lichter Breite von einem halben Würfel.

Wie immer sind die Fotos verkleinert dargestellt, wer draufklickt sieht mehr (click on pictures to see a larger version).

Das erste Stockwerk mit Seitenfenster und breiter Eingangstreppe (der "Lieferanteneingang" hinten hat eine viel schmalere und steilere Treppe).

Stockwerk zwei mit sehr schmalen Fenstern und Anfänge von Stockwerk drei.
Finishing Touches, Anlauf eins
Die erste Version des fertigen Turms
Im ersten Anlauf wurde das Gebäude optisch etwas gedrungen, vermutlich weil wir die höhere der beiden roten Etagen nur eine plus anderthalb Lagen hoch gebaut hatten.

Da man das Dach zum Glück in einem Griff abheben und beiseitestellen konnte, haben wir dann noch einen zweiten Versuch gemacht und die obere rote Etage etwas erhöht, danach gefallen mir die Proportionen etwas besser:

Zweiter Versuch, Hinteransicht (mit neu eingesetzten kleinen Rundfenstern aus 126)
Der fertige Turm (Vorderansicht) mit seinem (Mit-)Erbauer Jakob.